What the Installation Process for Artificial Grass Actually Looks Like from Start to Finish
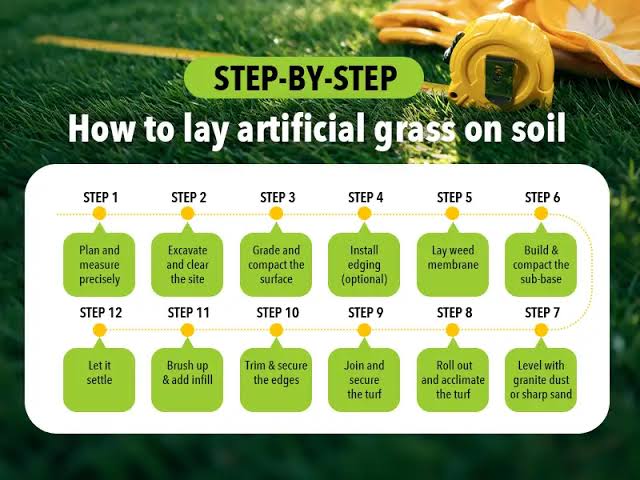
Artificial grass doesn’t just get rolled out and called a day. There are multiple stages involved, each one building on the last. Knowing what those stages are helps homeowners ask smarter questions — and understand why cutting corners at any point tends to cost more later. From the first site visit to the final brushing, here’s how the process actually unfolds.
Site Preparation and Ground Assessment
Nothing gets installed until the ground gets examined. Professionals look for drainage problems, compacted patches, existing vegetation, and low spots where water might pool. That last one matters more than people expect. Water sitting beneath artificial grass breeds odor and shortens the product’s life considerably. Weeds and old turf come out. The soil gets raked, leveled, and checked again. Any slope that sends water toward the lawn rather than away from it needs correcting before anything else happens. Rushing this part — or skipping it entirely — is probably the single most common reason artificial grass installations go wrong within the first few years.
Base Layer Installation and Compaction
Once the ground’s ready, a base layer goes in. Crushed rock or decomposed granite, typically spread two to four inches deep depending on local soil conditions, foot traffic expectations, and climate. Then comes compaction — a mechanical plate compactor presses the material into a firm, even surface. This is what keeps the grass from shifting or developing soft spots over time. Homeowners dealing with the region’s brutal summer heat and notoriously clay-heavy soil who choose artificial grass in OKC, depend heavily on this step to keep their lawns draining properly year-round. A sloppy base shows up eventually. Wrinkles, uneven footing, drainage failures — all of it traces back to what happened at compaction.
Artificial Grass Cutting, Positioning, and Securing
The grass gets unrolled across the prepared base. Installers position it carefully — not just for coverage, but for directional consistency. The pile needs to face the same way throughout, or the lawn looks patchy and unnatural. Edges get anchored with landscape staples or specialized fasteners. Where sections meet, adhesive bonds the seams so gaps don’t open up with use. Then excess material gets trimmed along pathways, patios, planting beds, and any other border. Clean edges matter. So does experience — this stage is where a rushed job becomes obvious and a skilled one disappears into the landscape.
Infill Application and Final Finishing
Infill comes last — but it’s not just a finishing touch. Silica sand, crumb rubber, or performance-grade alternatives get spread evenly across the surface. A power broom works the infill deep into the grass fibers, supporting the blades and giving the surface that slight give underfoot that mimics real turf. Without it, artificial grass sits flat, compresses fast, and loses its natural look within months. After infilling in, the installer does a full walk-through — checking for low spots, exposed seams, anything uneven. Final adjustments get made. Then the lawn’s ready to use immediately.
Conclusion
Every stage of artificial grass installation exists for a reason. Ground prep prevents drainage failure. Base compaction prevents shifting. Precise positioning prevents visible seams. Infill application preserves blade structure and feel. None of it is optional — at least not if the goal is a lawn that holds up through heat, rain, and heavy use without demanding constant attention. When professionals follow this sequence correctly, the result is a surface that looks good, drains well, and stays that way for years.




Post Comment